

Essential Hunting Gear and Venison Accessories: What Every Hunter Should Know Before the Hunt
When people talk about hunting gear and venison accessories, they are really talking about an entire ecosystem that surrounds the hunting experience. It extends far beyond the hunt itself and includes clothing, equipment, lures, weapons, stands, recipes, utensils, cookbooks, targets, art, record keeping, and even animal behavior. Hunting is not simply an activity; it is a collection of practices that connect preparation, patience, skill, and respect for wildlife.
Hunting Clothing: Function First
The first place to start is with what you wear. Hunting clothing must be functional before anything else, though it can certainly be stylish as well. Camouflage, often referred to as “camo,†typically uses patterns that blend sunlight and shadow with greens, tans, and dark gold tones to help hunters blend into their surroundings. Of course, camouflage changes depending on the environment. If you are hunting polar bears, for example, white camouflage would be essential.
Camo will always be in style for hunters, but the real priority is functionality. Look for clothing with enough pockets and loops for gear, and choose fabrics suited to your environment in both color and weight. Breathable materials are always a smart choice, especially for long days outdoors. Layering is essential in nearly every climate because mornings can be cold while afternoons warm quickly. Your outer camouflage layer should fit loosely enough to accommodate those layers underneath.
Modern hunting apparel often advertises features such as wind resistance, lightweight insulation, UV protection, insect resistance, and waterproofing. Many of these claims are accurate and worth considering when selecting your gear.
Where to Find Hunting Apparel
Large outdoor retailers such as Cabela’s, Bass Pro Shops, Gander Mountain, and Sporthill Hunting offer extensive selections of hunting clothing and equipment. These retailers add all kinds of visual and tactile experiences and education to make a visit memorable. Practical all-weather clothing and hunting gear can also be found at Academy Sports + Outdoors, Amazon, Dick’s Sporting Goods, JC Penney, Target, and Walmart.
Speaking of things that dreams are made of: Take a family visit to Springfield, MO and visit the largest Bass Pro Shop and Outdoor World. Johnny Morris’s first store – Springfield, will always be the largest. Next to the Shop, there is The Wonders of Wildlife National Museum and the Aquarium’s Great Oceans Hall. 500 W Sunshine St, Springfield, MO 65807. Plan to visit for a day or two.
Beyond Clothing
Beyond clothing, there are also plenty of comfort accessories available for cold conditions. Hunters can purchase hand warmers, foot warmers, blind warmers, and even self-heating survival meals designed for extended time outdoors.
Boots and Footwear
Proper footwear is critical. Waterproof boots or shoes are highly recommended, and they should be broken in well before your first hunting trip. New boots worn for the first time in the field can quickly lead to discomfort or injury.
If you already own boots you like, waterproofing treatments are widely available and can significantly improve performance in wet conditions. It is also wise to choose boots that allow room for multiple layers of socks when temperatures drop. You can never have too many pairs of socks available in any weather.
Transportation and Hunting Setups
How you travel during a hunt also affects the experience. Hunting vehicles range from large trucks and utility vehicles to ATVs and four-wheelers. In recent years, hunters have become increasingly mobile, often transporting multiple ATVs to reach remote areas quickly. Statically, ATVs and four-wheelers are extremely dangerous. Your guide and landowner probably don’t have insurance for you.
In the past, deer blinds were commonly hauled in on trailers. Today, mobility often takes priority. The debate between active pursuit and patient waiting remains a classic conversation among hunters. While both methods have their place, many hunters agree that the excitement of movement adds to the fun of the hunt.
If you are in a blind – TURN OFF YOUR PHONE!
Choosing Where to Hunt
Finding the right place to hunt is one of the most important decisions a hunter makes. Some people hope to know a landowner with private acreage who welcomes hunters to help manage deer populations. In reality, those opportunities are rare today. Many landowners have discovered that managed hunting leases can generate significant income, making wildlife a valuable asset.
As a result, hunters often seek access through guided hunts, private hunting leases, or established hunting operations. These range from high-end lodges with large trophy displays to simple camps with minimal amenities. Regardless of the setting, dedicated hunters typically find enjoyment in both environments. It is also worth noting that ethical hunting matters. Responsible hunters avoid operations that artificially confine animals to guarantee a kill.
Alternative Hunting Opportunities
Hunters may also choose to hunt on public land such as state or national parks, travel internationally for exotic game, or participate in charitable hunts that provide meat to those in need. Programs such as Hunters for the Hungry help ensure that harvested game benefits communities (Ask your meat processor about this).
Another important decision is whether to hunt independently or with a guide and outfitter. Guides can provide valuable expertise about terrain, wildlife patterns, and safe hunting practices.
Hunters must also decide whether they are pursuing a trophy animal or harvesting meat. Wildlife managers often cull specific animals for population management, which can sometimes make meat animals more accessible and affordable than trophy animals.
Hunting Methods and Strategy
Different hunters prefer different strategies. Some stalk their prey, others wait patiently in blinds, and some rely on scent and attraction techniques.
Popular methods include rattling antlers to imitate competing bucks, using scent attractants, applying deer urine around hunting areas, and establishing feed plots. Timed corn or pellet dispensers are also commonly used near blinds to attract game.
Regardless of the method, preparation matters. Hunters should always sight in their weapons and practice regularly to ensure clean and ethical harvests. Accuracy is a sign of respect for the animal.
After the Hunt
Once the hunt is successful, the work continues. Hunters may choose to mount a trophy as a lasting reminder of the experience or process the meat for meals throughout the year.
Processing venison often involves sharp knives, meat grinders, coolers, and freezers. Many hunters also enjoy experimenting with venison recipes, and numerous cookbooks are available dedicated to wild game cooking.
In many ways, the hunt does not end when the animal is harvested. From preparation to the final meal, hunting gear and venison accessories support an entire tradition that continues long after the season ends.
Field & Final Dressing
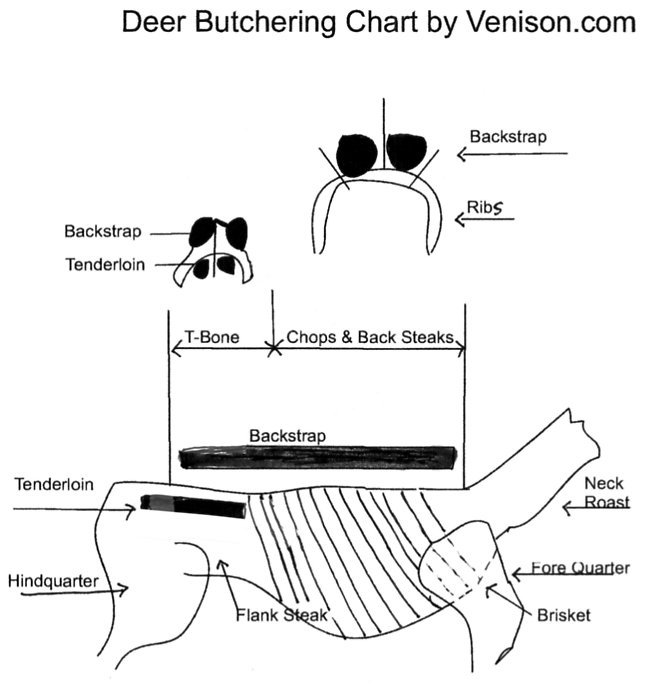
Best Advice: For best deer meat, field dress the deer immediately upon harvesting.
Minimum equipment: 7†sharp knife with serrated tip. Tub of moist hand wipes.
Nice to have:
- Latex or vinyl gloves.
- Rope & pulleys.
- Strong tree limb.
- The easiest field dressing is to hang the deer by the hind legs, splayed wide. But more important is to get the job done soon, so, on the ground is fine.
Important Current Information:
- Read up on the latest news and information on Chronic Wasting Disease and you’ll be safe in your harvesting and eating.
- Don’t mess up the meat. If you are hunting for meat, shoot your animal in the head, neck or shoulder without a lengthy chase or no chase at all.
- A shoulder shot is the safest and best bet because it is a large area and hits the heart or lungs and avoids damage to the rest of the organ area, especially the stomach and intestines. This is a good shot, too, if you want a trophy mount.
- He be Dead! Be sure your deer is dead before approaching to field dress him. If in doubt, shoot him again. Let this be your guide: It is sure an embarrassing story to be injured by a dead deer.
Bleed out:
Cut and drain the aorta: At the base of the deer’s throat, with your finger, feel for the breast bone. (To practice, feel at the base of your own throat for the V. In the deer, it will be an inverted C shape, an arched bone.) Insert a long sterile knife just above the bone into that spot and make a 3†stroke, across the throat. You know if you have cut the aorta because the blood will gush. (If you made a heart or lung shot, your animal may already be bled out, but just assume it’s not bled out and cut the aorta till you get some show of blood.) It’s ideal to have hind feet in the air, but it is more important to bleed out quickly. (The blood will go inside the cavity or outside. That doesn’t matter because you will pour it out later.)
[In commercial operations in the field (with non-native species), knives are kept in a shallow Tupperware container with a mat of cloth or paper towel and ½ “ or so of isopropyl alcohol to sanitize.
[Commercially, after initial bleeding out, the deer is ‘zapped’ by attaching clips to one ear and the opposite hind leg and ‘electrocuting’ it several times from a charger. The deer will flex and relax with each charge and this squeezes out blood from tissues. The theory is that this tenderizes the deer and also makes it easier to butcher. If you try this at home, shout “clear†before the charge so nobody is holding on to the deer and gets ‘zapped,’ too!]
Remove Scent Glands:
Look for scent glands below the “knees†on the hind legs. These will be dark, bulgy areas. Cut them out and throw away. Far away. Change gloves or wash hands (moist wipes OK) before going back to the carcass.
Open the skin:
Using the bleed-out hole or cutting a new hole near the anus, cut only the skin from the throat to the anus length-wise up or down the belly of the deer. You can lift up the skin, pinching it between your fingers, to get your bearings or initiate your cut.
Open the cavity:
The meat thickness over the stomach varies from thin lower down to thicker on the chest. The variance is usually 1-2 inches. Cut open the deer along the skin-cut-line to open to the cavity. Use the serrated knife edge to cut/saw the chest bones. Cut beside the sternum. The cavity will have all the organs neatly packed inside. Your goal is to keep all the organs intact and remove them from inside the cavity.
Removing the Organs:
- Feel around the group of organs and identify the tissues holding them in the cavity. At the top, you’ll find a couple of tissues securing the lungs to the rib cage. Cut them next to the rib cage.
- Grasp and cut the trachea (tube to stomach) and aortas (blood vessels) as far up the neck as you can reach. Work your way around the organs cutting what secures them inside the deer, scooping the organs out of the cavity as you go.
- At the rear end, depending on male or female, things will work a little differently. Primarily, you want to cut around the rear orifices (openings) from the outside leaving the canals to those orifices intact. That way, the whole irrigation and reproduction systems will come out with the other organs.
- Cut around the male testicles, leaving them attached to the organs. If the deer is hanging, the organs will fall out with gravity. If you are working on the ground, simply scoop them out.
- After removing the organs, retrieve any primary organs you want to save, such as the liver. Again, check latest news about CWD to see what is safe to eat. If you cut into any offal stuff, be sure to wash out the deer before hanging it to age.
Hang and Age the deer:
Hang the deer upside down by its legs with its hind legs splayed out wide and with the cavity wide open to the air. Some people like to skin their deer before aging. This speeds the cool down of the meat. Other people leave the hide on to age their deer.
Temperatures can range from 36-45 degrees F, the cooler the better. The carcass can even freeze at night and thaw during the day. A week is a good period to age the deer.
- Netting can be used over the carcass.
- Be sure the carcass is out of reach of predators.
[Note about Elk: Elk carcasses are more temperamental to age outdoors and spoil easier than a whitetail or mule deer. Definitely remove the hide before aging and cool near freezing.]
Removing the hide:
- Remove the hide before or after the deer has been aged. On the internet there are a million theories on how to remove the hide easily. There’s even a ‘YouTube’ clip with the hide being pulled off with a truck. Hmm, maybe the truck exhaust adds a nice flavor to the meat.
- It may be easiest to cut the hide off while the deer is hanging. It is also easy to do on a table. Mostly, you just want to take a sharp knife and gently pull the hide away from the meat and cut the connecting film.
- Cut a circle around the neck like a necklace or cape. Cut a circle around the lower shank and straight up the leg.
- Pretend you are a sculptor. Take your time and you’ll be safe as well as have a nice hide to cure.